Monochromatic photography has a long history of use in ophthalmology. Illumination of the subject eye with light of a specific color can enhance the contrast and visibility of various structures or findings. Traditionally, it is used in black-and white fundus photography to enhance anatomical details of the retina and choroid, but the same concept can also be applied to other parts of the eye.
Classic example of monochromatic green (red-free) rendition of fundus pathology. The green filter enhances the view to the retinal vessels and the macular lesion.
Monochromatic information can be captured by either filtering the light source (such as with a fundus camera), or placing a contrast filter in front of the camera lens to limit the color reaching the sensor. A subject color will appear lighter when photographed through a filter of the same color, and darker when photographed through a filter of its’ complementary or opposite color. For example, a red subject would appear lighter if exposed through a red filter and darker when photographed a complementary color filter, which in this case would be cyan (blue-green).
Red/Green/Blue color separations of a color fundus photograph of a choroidal nevus demonstrating the value on monochromatic rendering. The red channel shows a darkened lesion similar to the monochromatic effect using a red contrast filter. The blue and green channels suppress the view of the pigmented lesion.
In addition to the traditional technique of using monochromatic illumination with black-and-white photography, another alternative is to take full-color photos without filters and then use software to split the full color image into separate red, green, and blue color components.
Monochromatic views of a salmon colored conjunctival lesion. The lesion appears lighter than the conjunctiva in the red channel, while the blues channel darkens the lesion making it more apparent.A similar effect occurs in this image of subconjunctival hemorrhage. It’s a great example of how subject colors that are the same as the channel or filter will appear lighter. The blood is darkened by the green and blue channel.
This is a remarkably simple way to obtain monochromatic renderings from any full color image. It works particularly well with color slit-lamp photos of the anterior segment.
A conjunctival lesion stained with lissamine green. Here the red channel darkens the stain pattern, while the green and blue channel lightens the blue-green dye.
One disadvantage to this method is the loss of resolution that occurs when viewing just a single channel that makes up the full color image. It also limits the available monochromatic information to just the three primary colors, red, green, and blue, but that’s usually sufficient for anterior segment applications.
Monochromatic renditions of corneal blood staining.A dislocated cataract in the anterior chamber. Blue (which is the opposite color of yellow) darkens the lens almost completely, while the red channel enhances its appearance.
The act of learning through a medium that both educates and entertains.
Any of various media, such as computer software, that educate and entertain.
When I am invited to speak at educational meetings, one of the most requested and popular presentation topics is a program titled, Ophthalmic Jeopardy! Based on the popular television quiz show format that most everyone is familiar with, I’ve created an interactive learning experience that also manages to entertain. In short, it’s “Edutainment”. It’s not a new or novel idea, but I’ve taken it a step or two further than similar game show presentations in ophthalmic education. The evolution of Ophthalmic Jeopardy! is interesting.
Years ago, one of the faculty members at the Penn State Department of Ophthalmology approached me about improving our local technician education program. The program included a simple quiz-show format of questions-and-answers with the host reading questions out loud from hand-written cards. It worked, but he wanted to “jazz things up a little”. He told me he had done some online research and found a source for Jeopardy style lockout buzzers/lights that would allow contestants to buzz in when they knew the correct answer. He wanted to pick contestants from the audience and turn it into a competition. Now all he needed was a way to project the questions onscreen and asked if we could make it more interactive like Jeopardy, with onscreen columns of different question-and-answer categories.
I gave it some thought and told him it was possible, but entirely too much work to warrant the effort. But he knew me too well! I gave it a little more thought and started tinkering with the use of hyperlinks in PowerPoint to build an interactive screen that would allow us to randomly move back and forth between categories and questions. I had attended an OPS course entitled “Whiz-Bang PowerPoint Presentations” where Bill Anderson shared a way to hyperlink menus to organize an educational program with easy navigation between multiple speaker presentations. I figured I could build a Jeopardy template using similar hyperlinks between slides.
I converted our existing quiz questions into the Jeopardy answer and question format, but many of them were simple or dry examples. Taking inspiration from Jeopardy! and the sometimes tongue-in-cheek themes, I began accumulating new questions and categories that would entertain as well as test knowledge. In crafting questions, I’ve relied on many years of training and experience in writing questions for certification examinations. But instead of being restricted by the necessary rules for crafting certification questions, Jeopardy allowed me to have some fun and take liberties with some of the topics and content.
Suddenly the project grew and seemed to take on a life of its own. Each presentation contains over 250 hyperlinks, tons of photos, videos, and sound files. We can now chose from an ever growing bank of questions that numbers in the several hundreds! The content is never the same twice. Each time I present it, there are new content areas and questions, but I keep some of the core categories. Often the content will be customized to the specific audience; for example including a local trivia category at regional or international meetings. It’s a great way to review content from other presentations over the course of a day-long or multi day meeting.
In the early days, we would pick contestants who would use the buzzers to buzz in when they knew the answers, we kept score, and gave prizes to the winners. Different faculty members from Penn State Ophthalmology acted as the host and relished playing the part of Alex Trebek. I was the “puppet master” behind the scenes, driving the program and selecting the appropriate hyperlinks to navigate through the questions.
Something was still missing however. It was an entertaining spectacle, but the majority of the audience was reduced to bystanders when we could only chose five contestants from the group. So we eventually opened it up to the entire audience rather than a handful of contestants. At times it can become a little chaotic this way, but everyone seems engaged and involved.
Although we’ve used it at Penn State for audiences ranging from physicians, technicians and the general public, the version used at photography meetings has a higher level of both difficulty and “cheesiness”. Imagers seem to quickly recognize rare and unusual eye findings, but also have a warped sense of humor and “get” the tongue-in-cheek nature of the categories and questions. It works best with larger audiences so it’s become a staple at OPS Mid-Year Educational Programswhere the entire group is together in one lecture hall.
For the last several years, I’ve come out from “behind the curtain” and started hosting Ophthalmic Jeopardy myself. When I retire from ophthalmic photography, maybe I can be a substitute for Alex Trebek! It’s entertaining for sure, but at its core it’s also educational. It’s a fun way to both laugh and learn – in short it’s “Edutainment”!
The concept of edutainment isn’t limited to Ophthalmic Jeopardy. It seems to make it’s way into many of my presentations such as: Stereopalooza, OCT- Anatomy of a Scan, Cases That Tell a Story, Top Ten Uses of a 2×4 in Ophthalmology and others.
For information on how you can be in the audience for the next episode of Ophthalmic Jeopardy!click here.
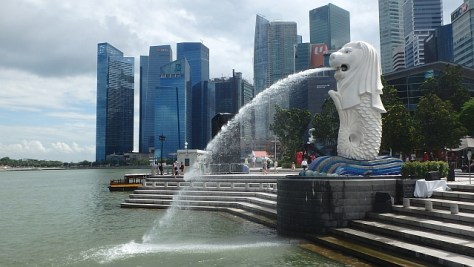
I’m still feeling a little jet lagged after traveling halfway around the world, but what an amazing trip! Along with over seventy other ophthalmic imagers, technicians, and physicians, I was in Singapore to attend the 2017 International Conference on Ophthalmic Photography (ICOP).
ICOP is a joint educational venture between several ophthalmic imaging organizations including the Ophthalmic Photographers’ Society (OPS) from the United States, the Ophthalmic Imaging Association (OIA) from the UK,the Australian Institute of Medical and Biological Illustrations (AIMBI) from Australia, and the Ooghelkundige Fotografie Nederland (OFN) from the Netherlands. Delegates from 15 different countries were in attendance at this conference.
The three day program was held at the Singapore National Eye Centre (SNEC). The educational program put together by Paula Morris, CRA, FOPS and Sarah Armstrong, CRA, OCT-C, FOPS, included invited lectures, special keynote lectures, and Scientific Paper sessions from dlegates in attendance. Keynote lecturers included Wong Tien Yin, MD, PhD discussing: How a Fundus Photograph Can Save Your Life, Giovanni Staurenghi, MD who presented: Old and New Angiography, Suber Huang, MD who showed amazing images in his lecture: The ASRS Image Bank – a Worldwide Legacy and Gavin Tan Discussing: OCT Angiography – Changing the Way We See.
Photo by Chris Barry, FOPS
I was honored to attend ICOP as not only a delegate, but as an invited lecturer. I ended up presenting all three days of the conference and it was a great honor for me to contribute to the program in this way. I chose topics that I felt would appeal to an international audience and I think it worked out okay. I presented a version of Ophthalmic Jeopardy! that I customized for an audience that was unfamiliar with the namesake television quiz show, that while famous in the U.S., isn’t broadcast in Singapore. Talk about performing a high wire act without a net! I made sure I had some content that everyone could relate to including local Singapore trivia and a review of content covered by presenters in many of the earlier lectures.
The imaging staff at SNEC is renowned for the quality of their ophthalmic photography and they were clearly happy to be hosting this event on their home turf. On a tour of the facility, award winning images were displayed prominently on the walls of the imaging department. It was inspiring to see such an amazing collection of work of the highest quality. Photographers Joseph Ho, Kasi Sandhanam and the rest of the SNEC staff are amazing imagers that are able to balance the efficiency needed to handle a high volume of patients with the highest standards in image quality. They are true professionals in our field.
John Leo with his award winning image. Photo by Chris Barry, FOPS.
Speaking of high quality imaging, the conference also included a photo competition and exhibit that showed some incredible clinical and artistic imaging. Award winners included Sarah Armstrong, Lisa Brealey, Angela Chappell and John Leo.
Photo by Chris Barry, FOPS.
In addition to the educational content during the conference, there were exhibits by a number of sponsoring vendors, some incredible refreshments during the breaks, and a fun evening of food, music, and comradery at the welcome reception.
A highlight of the reception was the photo booth that not only produced mementos of the occasion, but acted as the perfect icebreaker, as spontaneous groups of old friends and new acquaintances would pose together in the spirit of ICOP!
Of course as professional imagers, most attendees had cameras with them and spontaneous selfies were popping up everywhere!
This is the second time that ICOP has been held in this thoroughly modern and spectacular city of Singapore, having previously been hosted here in 1990. And what a great venue for an international conference! Singapore represents an incredible blend of Asian cultures, British influence, modern architecture and great weather.
Like many other delegates I tried to visit as many of the popular sightseeing spots as possible including, Marina Bay, Merlion Park, Super Trees, Sentosa Island, Chinatown, Buddha Tooth Temple, Hawker Markets, the Mt. Faber Cable Car, Henderson Waves, Botanical Gardens and many more. With all these famous sights and numerous museums, there is so much to do and see in this amazing city.
Local residents Paul Chua and Albert Sim took some time to show us some of the local sights in the evenings and recommend the best food stalls in the hawker markets. Joseph Ho hosted an amazing dinner of chili crab at Jumbo Seafood. Alan Wee wrote a great blog post for the OPS/ICOP website with a list and map of places to visit, along with suggestions for some of the best food and coffee shops in the city. It was great having such knowledgeable local guides to help us experience all that Singapore has to offer.
Like many other ICOP delegates, I tried to take in as many of these sights as possible. One of the attractions on my list was the Trick Eye Museum on Sentosa Island which seemed like something an eye imaging professional should check out, at least for a laugh or two. It’s a place where you can take some really cheesy selfies with props and silly scenes in the background! Although I didn’t have time to visit, I walked past and snapped a photo or two. Maybe next time.
ICOP 2017 was an amazing success. Kudos to the international ICOP planning team of Paula Morris, Sarah Armstrong, Chris Barry, Ethan Priel, Becky MacPhee, Angela Chappell and Gerard de Graaf.
The SNEC staff and organizing committee were incredible hosts from Gemmy Cheung, MD, Wong Tien Yin, MD, Gavin Tan, MD, Dr Thiyagarajan Jayabaskar and Lim Hui San, to Joseph Ho, Kasi Sandhanam, and the rest of the imaging and AV teams. They really know how to put on a professional conference.
It was great seeing old friends from around the globe as well as make several new ones.
Photo by Chris Barry, FOPSPhoto by Chris Barry, FOPS
ICOP promotes networking with colleagues and seems to make the world just a little smaller. I believe that each of us found that we all have so much in common no matter how far apart we live. I look forward to the next ICOP which will take place in 2020 at a location yet to be determined.
Along with holidays and festive celebrations, the end of the calendar year often marks the deadline to complete any recertification requirements in order to maintain your professional credentials. I recently completed my OCT-C (Optical Coherence Tomographer-Certified) recertification in December, and just received my updated certificate in the mail. That will hold me for another three years. At the end of 2017, my other professional credential, the Certified Retinal Angiographer, will be up for recertification. It will mark my 30th year of proudly holding the CRA.
I’m not alone when it comes to maintaining these voluntary certifications. Johnny Justice Jr. continues to set an example by maintaining the CRA credential that he originally obtained in 1979 (the first time it was offered). That’s amazing to me. Several others from that inaugural group of CRA recipients, including Peter Hay, Phil Chin, Tom Egnatz, and Chuck Etienne, also maintain their CRA after all these years. None of them have anything to prove at this point in their careers, especially Johnny. He is a pioneer in the profession and was the driving force and founding member of the Ophthalmic Photographers’ Society. He is a well-known author and lecturer, and is universally considered the “Father” of our profession. He certainly doesn’t need the CRA to gain employment, or practice in his chosen profession. He proudly maintains his CRA out of respect for the credential, and what it means to the profession that he helped to create. It clearly has value to him after all these years and all his accomplishments.
In a highly technical field such as ophthalmic imaging it may seem surprising there are no licensure or certification requirements. Certification is strictly voluntary to perform in these roles. It is estimated that less than half the people working as ophthalmic photographers, assistants, or technicians are certified. It’s not easy to obtain certification, and it shouldn’t be. After all it’s meant to identify individuals who have demonstrated a designated level of competence in their field. It takes knowledge, skill, and experience to successfully complete the examination process for certification. Anyone who has completed this process knows the significant effort that is required.
So why get certified if it isn’t required, universally recognized, and takes significant effort? It’s about value. The benefits of certification are often tangible: increased job satisfaction, enhanced job mobility, increased earning power, and a competitive advantage for advancement or the best employment opportunities. But the benefits don’t stop with the certified individual. They also extend to the employer, ophthalmologists, insurers, and most importantly, our patients and their families. All of these groups benefit from knowing they are dealing with a recognized professional.
Certification also helps establish a professional identity and recognition by your peers. It certainly did that for me. In fact, I worked in the field for nearly ten years before initially pursuing certification. I decided it was time to move on in my career and needed certification to gain access to the best jobs. It worked, as my next employer required the CRA as a condition of employment. But I was pleasantly surprised by the additional benefits that certification provided. Although I was very skilled in the technical aspects of photography and had worked at one of the most prestigious institutions in the world, no one outside my place of employment knew my name. That all changed when I obtained my CRA. I suddenly had the respect of my peers and began receiving invitations to play a role in professional activities in the OPS and beyond. Certification seemed to be “the price of admission” to important networking opportunities that lead to leadership roles in the OPS and JCAHPO. From there came many opportunities to share my knowledge through lectures and publication. And it all started with certification.
But the process doesn’t end when you first receive your credentials. Certification is much more than a one-time achievement. It is a dynamic, career-long commitment to continued education, assessment, and professional development. There is incredible value in attaining, and also maintaining, your certification.
In the early days of retinal angiography, photographers often worked very closely with ophthalmologists, learning together as they explored the diagnostic uses of fluorescein angiography and unraveled the complexities of interpreting the fascinating images they were capturing. This spirit of scholarly collaboration between imager and physician continues today in a new book: Optical Coherence Tomography and OCT Angiography, Clinical Reference And Case Studies by Darrin Landry and Amir Kashani. These authors are both well respected in their respective fields as educators and authors. Together they have created a timely textbook that will appeal to members of both professions.
Before receiving an advance copy of this book for review, I anticipated that the content would focus almost exclusively on OCT angiography. I was pleasantly surprised to find that although the book features OCT-A prominently, it is much more than a text on this new state-of-the-art technology. It appropriately places OCT-A in the context of multiple imaging modalities to assist in diagnosis of a variety of retinal conditions.
The authors have produced a book that is part tutorial, part clinical atlas, and a collection of over forty cases that “puts it all together” using multiple imaging modalities with clinical descriptions. The book is divided into three sections:
Section 1. OCT and OCT Angiography
The introductory section will be particularly useful to imagers as it includes a basic overview of OCT and OCT-A technology, followed by a discussion on pattern recognition, normal anatomy and layers of the retina, how to move the scan pattern, recognizing artifacts, EDI/FDI and a basic primer on OCT-A. The OCT-A primer explains how this technology scans through the z-axis and detects motion to identify the retinal vasculature including the deep retinal plexus. It includes a discussion of artifacts specific to OCT-A . This section will be especially helpful to those new to OCT and OCT-A, and anyone preparing for certification as an OCT-C.
Section 2. Atlas of Images and Disease Pathology
This section is an atlas of retinal OCT findings organized in anatomical order from the vitreous to the choroid. For each condition, the text includes a brief discussion of the disease process, clinical findings, and appearance in multiple modalities. For each condition, there are multiple image examples providing a full spectrum of potential findings for that disease. For instance, there are over twenty different examples of epiretinal membrane. Novice imagers will find this variety especially helpful in learning to recognize different manifestations of a single condition. In addition to common retinal findings the book also includes good examples of less recognized conditions such as outer retinal tubulation (ORT) and reticular pseudodrusen. As expected, retinal vascular diseases include OCT-A examples along with SD-OCT and other imaging modalities including fluorescein and ICG angiography. Experienced imagers will recognize many of these conditions, but the addition of OCT-A will give them another viewpoint and expand their understanding of each disease.
Section 3. Case Studies
The final section of the book is a series of over forty cases where the authors combine a brief medical summary with appropriate imaging modalities for clinical correlation. This format fits well with the current trend of “case-based-learning” in medical education. In many of these cases, OCT-A dovetails nicely with other imaging modalities to increase our understanding of a disease process or help confirm a diagnosis. This quote from the book’s Preface describes the format well “These images are presented in the context of additional imaging modalities to aide the reader in making useful correlations.”
In conclusion, this timely book is well organized and thorough, without becoming unwieldy. It is easy to navigate between sections if you want a quick reference on OCT anatomy or to look for examples of specific retinal conditions and how they may appear on OCT, OCTA and other imaging modalities. With over a thousand images and forty cases, to say that this book is generously illustrated would be an understatement. It is an impressive collaboration between an ophthalmic imager and a retinal specialist that should appeal to a wide audience that would include ophthalmic imagers, retinal technicians, residents in training, and clinicians wanting a reference for clinical correlation between modalities.
From a personal standpoint, I think it’s great to have an ophthalmic imager making a significant contribution to the ophthalmic literature. Darrin’s collaboration with Dr Kashani serves as a model for what imagers can accomplish when we collaborate with physicians on a professional level. The spirit of collaboration between professions is echoed several times in the book including this statement from the Introduction, “Constant and close communication between the physician and imager is very essential.”
Reviews like this often end with a cliché that suggests that everyone in the profession should “add this book to your collection” or “keep a copy on your bookshelf”. I’ve tried to avoid those clichés, but honestly, I am happy to have this book in my collection and plan to keep it handy in clinic for reference, especially as we integrate OCT-A into our own diagnostic armamentarium.
August 19th is recognized as World Photo Day, an international celebration of photography. This date marks the anniversary of the public unveiling of the Daguerrotype by the French government in 1839. It is an important milestone in the history and evolution of photography.
The story surrounding the invention of photography is both compelling and controversial. Several individuals claimed to be the true inventor of photography. The series of competing announcements by Louis Jacques Mandé Daguerre, William Henry Fox Talbot, and several others became a frantic race filled with secrecy, surprise, jealousy, financial reward, political maneuvering, and legal action.
To this day it’s still not entirely clear who was first to invent photography or exactly when, but history ultimately crowned a winner. Although Talbot (and others) made several significant early contributions Daguerre is generally given credit as the inventor of photography and August 19, 1839 is often recognized as the day that photography was born. Whether or not this is accurate is open to debate, but it seems a good a day as any to celebrate the history and evolution of the photographic arts.
It seems almost too obvious to mention, but just like you can’t see through a window when the window shade is pulled down, you cannot view or image the interior of the eye through closed eyelids.
Obviously we need fully retracted upper and lower lids to get the best view of the fundus with our fundus camera, SLO, or OCT. Because these are noncontact imaging techniques, image quality is also dependent on a regular ocular surface and clear ocular media. An intact tear film is an important optical component of the ocular media. Simply put, to get the best images we need to strike a balance between fully retracted lids and frequent blinking to maintain the tear film.
Top: Shadow from partially retracted upper lid appears at the bottom of the fundus image and degrades the OCT signal. Bottom: fully retracted lid improves the illumination of fundus image and improves signal strength in the OCT.Lashes partially obscure the retinal view in the top image. A fully retracted lid improves the view.
Many patients are nervous about their visual symptoms and what diagnosis the imaging procedure might detect. They often try hard not to blink during the session thinking it will help you get the best images. But their tear film will break up during this time and the view will become compromised until they blink again. And they often apologize for blinking!
To compound this dilemma, these imaging tests are often performed after a patient has undergone an extensive screening workup that includes IOP measurement, and application of topical anesthetic and dilating solutions. Patients may also undergo gonioscopy or macular contact lens examination prior to imaging. A disrupted tear film is an unintended side effect of these procedures and can adversely affect imaging quality.
Top: irregular ocular surface causes degradation of both the fundus image and OCT as the tear film breaks up from lack of normal blinking. Bottom: after a few blinks, the view improves dramatically. Artificial tears would similarly improve the view.
It may seem counter-intuitive, but encouraging patients to blink frequently during imaging sessions can improve cooperation and image quality in fundus photography and OCT imaging. In our clinic, patients are often surprised that we encourage them to blink, having had procedures done in other clinics where they were sternly cautioned against blinking. In my experience as a consultant and workshop instructor, I have often heard OCT operators repeat the words “Don’t blink!” while performing a raster scan pattern that may take several seconds to capture.
Artifact from blinking during a volume scan. Timing the patient’s blinking pattern can avoid this type of artifact.
They know that a blink will result in an artifact in the volume map, but fail to recognize the need for frequent blinking. I don’t really blame the operator. Often that’s how they were taught to perform the scan during a workshop or training session by the manufacturer’s trainer:
No wonder the patients are afraid to blink! Frequent blinking not only refreshes the tear film, it makes the patient feel more comfortable and ultimately more cooperative. You’ll soon learn to recognize a patient’s blinking rhythm and you can time your image capture just as their upper lid is retracting after a blink. Gently encourage the patient by saying, “hold your gaze for just a moment” when you need just a second or two longer to capture a good image. When frequent blinking doesn’t work, application of artificial tears can also make a difference in patients with dry eyes or compromised tear film.
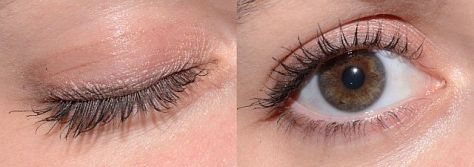
Partial versus fully retracted upper eyelid. Image quality is compromised by the lid and lashes in the left images. Gently retracting the upper lid immediately after the patient blinked improves image quality.
During fundus photography, the flash of the camera will cause an involuntary blink that helps refresh the tear film. If the lid or eyelashes obscure the view, gentle retraction of lids with a finger or q-tip may help. You don’t need to forcefully tug on the lid, just retract it a couple of millimeters to get any lashes out of the way and reveal the entire pupil. Patients are often still able to blink with this mild retraction of the upper lid.
So encourage your patients to blink regularly and learn to capture the best images in between the blinks. If it weren’t for all the blinks, anyone could do this job!
I always look forward to receiving my copy of the the Journal of Ophthalmic Photography in the mail. Even after reading digital proofs as an editor or contributing author it’s great to see the final product in print. There’s just something tangible and authentic about turning the pages of a high quality publication printed on good stock.
I was especially looking forward to the Spring 2016 issue of the JOP. It contains an article I contributed on The Confocal Tonal Shift. What’s unique about this article is that evolved from a blog post here on eye-pix into a scholarly article (of sorts).
The blog was based on an observational series of photographs that documents the tonal changes that occur when focusing the Heidelberg Spectralis, a confocal scanning laser ophthalmoscope (cSLO). I put the blog together to further my own understanding of just what I was seeing with the cSLO, and share my observations with fellow imagers. When asked to convert the blog into a piece for the JOP, I initially felt it was too informal, opinionated, and lacking strong references to be included in the professional literature.
But the kernel of a good idea was definitely there. So I worked backwards and did a literature search after the fact. Then I reworked the article and was able to place my observations into the context of other clinical findings described in the ophthalmic literature. Probably not the ideal way to develop an idea into an article, but in this case it worked.
A mentor of mine has always encouraged me to get as much mileage as possible out of a project. The Confocal Tonal Shift is a good example of that. It’s gone from a blog post to a formal article in a well-respected professional journal. I’ve also adapted it into an expanded lecture topic (The Quirks of Confocal Imaging) that I presented at a recent educational program. It received good feedback and will work it’s way into my lecture rotation this year.
When performing fundus photography or angiography, patients often ask about the technology used to help diagnose their ocular condition. After explaining that it’s a form of photography, the conversation will often turn to cameras. Patients sometimes ask for advice on what type of camera to buy for personal use. Often they’ll tell me about a particular camera they have and will invariably say “the camera takes great pictures”.
I’ve always found this expression and the concept behind it quite amusing. It assumes the person looking through the viewfinder and pressing the shutter button has nothing to do with it! On several occasions these conversations took place at a VA hospital while photographing vets. They’ll talk about having purchased a camera overseas, such as a Voigtlander, Zeiss Contax, or Leica in Europe during WWII, or a Nikon while stationed in Japan, Korea, or Vietnam. Without fail, they’ll tell me that “the camera takes great pictures”. All are quality cameras with good optics, but none of them are capable of taking pictures on their own. Someone has to compose the image and press the shutter.
A related misconception has occurred in ophthalmic imaging over the past decade. With all the automated features such as eye tracking, sampling, auto-alignment and auto-exposure, etc. in the current crop of instruments, there is a perception that retinal imaging is simple and easy to perform. The implication is that the machine takes the picture, not the operator.
It’s true that recent advancements in technology have improved and simplified image capture, but I still believe that skilled photographers produce the best diagnostic images. I once had a conversation with an overly-enthusiastic OCT salesman who claimed his instrument was better than the competition. As proof, he showed me two images of the same patient taken with two different OCT instruments. “See”, he said, “The competition’s instrument missed the pathology”. I corrected him saying that it wasn’t the instrument that missed the pathology, but the operator.
High resolution line scan of a small retinal arterial macroaneurysm captured using the free scanning technique.
This sparked an interesting debate. I argued that a skilled OCT operator, given appropriate direction from the ordering physician, would not have missed the area of interest. Ultimately we agreed it’s up to the operator to make the best use of the technology they have available.
Several famous photographers have weighed in on the relationship between camera and photographer in producing great images. I love these quotes:
“You don’t take a photograph, you make it.” Ansel Adams
“The camera doesn’t make a bit of difference. All of them can record what you are seeing. But, you have to SEE”. Ernst Haas
“The camera is an instrument that teaches people how to see without a camera.” Dorothea Lange
“Photography is the art of observation… I have found it has little to do with the things you see and everything to do with the way you see them.” Elliot Erwitt
“There is nothing worse than a brilliant image of a fuzzy concept.” Ansel Adams
And finally, whenever someone states, “This camera takes great pictures”, I reply with another common quote that’s been attributed to several people, including boxing trainer Roger Mayweather, basketball great Charles Barkley, and possibly even Confucius:
“It ain’t the tools, it’s the carpenter”.
Slit-lamp photograph of dislocated intraocular lens implant and iris erosion shown in transillumination. Slit-lamp imaging relies on advanced photographic lighting techniques to accurately document the condition of the eye.
Voigtlander camera image from Wikimedia Commons: https://en.wikipedia.org/wiki/File:Vitorets.JPG#filelinks
One of the most fundamental yet difficult tasks for beginning photographers is proper adjustment of the focusing reticle of the traditional fundus camera. It is an essential element for capturing consistently sharp retinal photographs. The focusing reticle is the pattern of etched black lines, usually a cross-hair pattern, seen through the fundus camera eyepiece. The reticle is part of an aerial image focusing system like that used in microscopes. An aerial image system is brighter than one that uses a ground glass screen like an SLR camera. In fundus photography the aerial image is important. We need as bright a view as possible to keep the viewing illumination low enough for the patient to tolerate while still being able to see well enough to align and focus the instrument. Yet because the image is focused in “space” rather than on a ground glass, the reticle must match the same plane of focus as the fundus image.
The principle behind this adjustment seems simple enough, but there are some challenges associated with it. Setting the reticle adjusts for simple spherical refractive errors in the observer’s eye when their accommodation is relaxed at distance. You can think of this process as calibration of the optical system prior to focusing the fundus camera. The focus of your eye needs to be set at the same aerial focal plane as the camera. Simply put, both the crosshairs and the fundus need to be in focus at the same time. Set the reticle first and then adjust the focus of the camera.
In order to properly focus the fundus camera on a consistent basis, the photographer should relax their accommodation at distance to avoid accommodative shift during photography. The reticle is then adjusted by turning the eyepiece until the cross hairs are sharp. The barrel of the eyepiece is marked in diopters of correction. Since we are in the eyecare business, many of us know what our refractive error is, and you may be tempted to use that number as your reticle setting. Unfortunately, the diopter numbers may not be accurately marked on the eyepiece and can vary by manufacturer or instrument. So they can’t be relied on when switching from instrument to instrument. The reticle must be set correctly for each instrument.
You also can’t just set the calibration once and be done. A disadvantage to the aerial image is that your eye may change focus due to accommodation. Keeping the cross hair sharp requires constant awareness since your accommodation can change throughout the day due to fatigue or stress. Young photographers may struggle with keeping the eyepiece set properly because they typically have a greater ability to accommodate to near. Early in my career, I often noticed that my eyepiece setting would change as the day went on. It would also change during the week, Mondays were different than Fridays and accommodation also changed with stress levels. Pay constant attention to the cross hairs and adjust the reticle if your accommodation drifts.
If you normally wear glasses or contact lenses, it is usually best to wear them while taking fundus photos rather than rely on the camera eyepiece to correct for your refractive error, especially if you have any astigmatism in your dominant (shooting) eye.
A popular and commonly taught technique for setting the eyepiece reticle involves adjusting the crosshairs at least three successive times, noting the diopter setting each time, and then using the average of these numbers. This technique sounds like a good idea, but it can actually promote unnecessary accommodation and inaccurate settings. Each time the photographer looks at the numbers marked on the eyepiece, they accommodate to near, then immediately try to relax at distance before looking through the viewfinder again. Repeating these steps multiple times induces accommodative “gymnastics” and subsequent fatigue that can lead to improper settings when accommodation inevitably drifts during a photographic session.
For this technique to work properly, someone other than the photographer should note and record the settings, so the photographer can keep accommodation relaxed at distance the entire time.
A better strategy is to ignore the eyepiece numbers altogether, but pay constant attention to the crosshairs and image of the retina. As long as the crosshairs and the aerial image of the fundus both appear sharp at capture, the focus will be correct in a system that is properly calibrated for parfocality.
For more on the basics of using the fundus camera visit the Fundus Photography page.